Category Archives: Reference and Lists

My own internet notes.

Watch Battery Types

This will never be a complete list, but there does not seem to be a good list of watch battery type by model online to even get an idea. Have to start somewhere! Owner’s manuals are not always available so usually you have to open the watch and take out the old battery.

  • Bulova Accutron N7, uses 344 battery.
  • ESQ, Swiss
    • E5402: 364
  • MVMT, from their customer support:
    • The batteries for our Classic, Chronos, Voyagers, Modern Sports, Rise, Signature, Gala, MOD, Field, Element, and Dot watches are SONY SR626SW. The 40 series, Revolver, Odyssey, Boulevard, Avenue, Nova, Bloom, Signature II, Signature Square, Coronada watch batteries are SONY SR621SW. Our Blacktop watches use SONY SR927W batteries. Our Element Chrono watches use SONY SR920SW.
  • Nixon
    • Bring It, The Porter 17F: 364
  • Wenger
    • Victorinox Swiss Army 24908: 377
    • S.A.K. Design: 362

Watch Batteries in a Flash has this good cross reference once you know one of the battery identifiers.

Also, from Watch Batteries in a Flash, PRO TIP: If you are having a hard time determining your battery, measure the width of the battery and then the height. Use the dimensions against the Dimensions column to find the battery that you need. You can also use a micrometer to measure the inside of a battery cavity to find out which battery you need.

Git Commands

Terminology

origin =

main =

master =

remote =

Head =

Headless mode =

Modified =

Staged =

Committed =

Informational Commands

Git can be a little intimidating at first because it has the power to change the files you are working on, so it’s good to start with commands that don’t do anything to get a feel for the situation before you actually do something.

git config --list

Shows useful information about the current repository. Shows the remote.origin.url variable for example.

git config --get remote.origin.url

Shows just the url associated with local git repository.

git config --list --show-origin

Shows ___.

git status

Probably the most common git command.

git diff

To see changes since the last commit. Or

git diff > gitdiff.txt

for a text file of the information.

ls -al ~/.ssh

To check for SSH keys (on Linux only I think).

git log --oneline

Is useful to see all the commits in a row with their commit messages. Or

git log --oneline --decorate --graph --all

for more detailed information.

git log -p filename.py > log.txt

Makes a file with the entire change history of filename. The -p is patch text. This is great for resurrecting “lost portions” of code and replaced the file I used to keep: “unused code.txt”

git branch -v -a

Lists all the branches including remotes, with the current branch highlighted in green plus an asterisk.

git branch --show-current

Shows just the current branch.

git tag -n1

Says to list all the tags and show 1 line of annotation per tag. Default is 0 lines of annotation.

Initial Set-Up Commands and Connecting to GitHub

Notice above command to check for existing keys.

The first step is establishing an SSH key on the machine to be connected to GitHub then copy the public key to GitHub. This is a pretty good description of how to do that. Notice Git bash in Linux is just the command line of a Linux machine with Git installed while on Windows you have to open the Git bash executable for a Git-specific terminal.

git clone [github url].git

Notice the format of the remote url determines SSH versus https transfer.

To initialize, navigate to the directory where your code is stored, and:

git init

to initialize git tracking of the directory.

git add

to add files. You can add one at a time to be selective or

? how to add all the files in the directory, then ignore?

Daily “Save Your Work” is Commit

This is a pretty good list here, but it lacks informational commands.

git commit -a -m 'commit message here'

git push

Are the daily “save your work” commands.

Renaming a File

git mv old-filename.something new-filename.something

To rename a file, use git to rename it instead of renaming it manually. This allows git to track the rename instead of appearing to be “delete and add new.”

Deleting a File

git rm filename

To delete a file, use git to allow git to track the deletion. Don’t do it manually or it just shows up missing.

Revert a Single File to an Old Version

git checkout <commit ID> filename

There are various ways to do this (restore and revert maybe?) but I did it once like this and it worked. You have to be OK with losing any work in that file since the last commit. The point is it doesn’t affect the other files.

Branching

git branch <new-branch-name>

To create a new branch.

git switch <new-branch-name>

To switch to a different branch (same as the still-valid git checkout <new-branch-name>)

git checkout -b new-branch-name

To create a new local branch and switch to it in one command.

git push --set-upstream origin new-branch-name

? is that right, not just push?

How to create a branch on GitHub here.

Tagging

git tag -a v1.0.0 ec595fb -m 'message here'

then

git push origin v1.0.0

to tag a past commit. Version naming convention is [Major].[Minor].[Patch]

Merging

To merge, create a pull request on GitHub, then compare and merge. It’s pretty self-explanatory, THEN to update your local repository:

git fetch

because you made changes to the GitHub version, but not your local version, so the changes have to be fetched (opposite of push I think?)

git switch main

to switch to the main branch, and you should see a message saying the local main is behind origin/main, then

git pull

to pull the commits into the local branch. Merge complete.

Remote Repository (GitHub Usually)

git remote -v

lists the remote repositories.

git remote set-url origin git@github.com:rr34/Astro.git

allows you to change the remote url for the origin.

GitHub-Specific Features

The following are features in GitHub only, not classic command line Git:

  • Releases – but tags are command line and also a way of doing releases.
  • Pull requests

Terminal Commands by Project – Scripts

Syntax and Basics

Linux
  • $ is the normal prompt for commands
  • # is the system administrator prompt
  • in the C shell, the prompt ends with %
  • > is used to send the output to a text file. >> is used to append the output to an existing text file without over-writing.
  • $VARIABLE_NAME is a variable
  • apt combines apt-get and apt-cache and it is newer. Use apt.
  • sudo apt update && sudo apt upgrade -y
    • To install Python packages, use apt only if you want to install directly on the machine, otherwise use pip. Pip installs modules slower, but installs the latest versions, and most importantly works within a virtualenv. In the special case of Raspberry Pi, use apt because it knows the unique processor architecture and installs the correct builds of modules.
  • script savedcommands.txt
  • A .sh file is an executable shell script. # to comment within
  • ./ is used to specify the current working directory especially when running something that could be the same as a system command.
  • nano is the basic user-friendly text editor.
  • To view $PATH, echo "${PATH//:/$'\n'}" or just echo $PATH
  • To edit $PATH for the current session, export PATH='/new/directory:$PATH'
  • > sends command output to a file. >> appends the output to a file without overwriting existing contents.
Windows PowerShell
  • The prompt is PS C:\current\path>
  • %VARIABLE_NAME% is a variable
Get the latest version of PowerShell

PS > winget search Microsoft.PowerShell

PS > winget install --id Microsoft.PowerShell --source winget

Scripting with PowerShell ISE

PS > Get-ExecutionPolicy -List

PS > Set-ExecutionPolicy -Scope Process RemoteSigned

Set Up Python from Scratch on Windows

Python is not natively-installed on Windows, unlike on Linux machines. This pretty much covers it: https://learn.microsoft.com/en-us/windows/python/web-frameworks

Develop in Python Using VS Code and WSL

PS > wsl --install

PS > wsl --list --verbose

PS > wsl

# code .

Install a Local Python from Source

sudo apt install -y make build-essential libssl-dev zlib1g-dev libbz2-dev libreadline-dev libsqlite3-dev wget curl llvm libncurses5-dev libncursesw5-dev xz-utils tk-dev

To install dependencies.

What this does: download source code, unpack it, make directory ~/.localpython to install into, run the configuration file setting install going to install folder, compile, install compilation, create a virtualenv pointing to the install, switch to the virtualenv to use it:

mkdir ~/src

cd ~/src

$ wget http://www.python.org/ftp/python/3.11.0/Python-3.11.0.tgz

$ tar -zxvf Python-3.11.0.tgz

$ cd Python-3.11.0

$ mkdir ~/localpython3110

$ ./configure --prefix=$HOME/localpython3110 --enable-optimizations

https://realpython.com/installing-python/#how-to-build-python-from-source-code

$ make &&make altinstall

Set Up venv

$ ~/localpython3110/bin/python3.11 -m venv py3110_venv

$ source py3110_venv/bin/activate

$ sudo apt install python3-pip -y

$ pip install --upgrade pip

$ pip install tk pillow numpy astropy astroplan pandas pytz matplotlib scikit-learn

$ pip list

$ pip -V

$ which python

$ pip install --upgrade pip

$ pip freeze --local > requirements.txt

$ deactivate

$ rm -rf somename_env

$ pip install -r requirements.txt

Note the venv folder stores neither the Python installation nor your code for your project. It is only used to store version information about the Python installation used for your project.

Install Packages from Local Folder

pip download package1 package2 -d'~/src/python-packages'

pip install package1 package2 -f ~/src/python-packages --no-index


AstroWideImageMapper and Exiv2 with Python

sudo apt install python3

sudo apt install exiv2

sudo apt install -y python3-tk python3-numpy python3-pandas python3-astropy

pip install -U scikit-learn

python -c 'import os, sys; print(os.path.dirname(sys.executable))'

to see the path to the current python installation.

PS > $env:path -split ';'

to see the path variable in Windows (readable format)

Astropy on a Raspberry Pi Zero W

This is step-by-step how to install Astropy and Astroplan on a Raspberry Pi Zero W (1st gen, not the ‘2’).

Raspberry Pi OS download here along with imager here.

sudo passwd (change from default as desired for security)

sudo raspi-config

Set up location, time zone, language, keyboard, Wi-Fi, SSH. Turn off Bluetooth? How?

python --version

>> Python 3.9.2

sudo apt install python3-pip – for the Raspberry Pi, it is better to not use pip because it installs software not compiled for the Pi (the Pi Zero ISA is ARMv6l).

sudo apt install python3-numpy

sudo apt install python3-astropy

Note! Astropy installs this one. Not the rc2 or any of the other ones.

sudo apt install python3-pyerfa (installs with Astropy – I think)

sudo apt install python3-pyyaml (installs with Astropy – I think)

sudo apt install python3-packaging (installs with Astropy – I think)

sudo apt install python3-astroplan

sudo apt install python3-pytz (installs with Astroplan)

Other Astroplan options here.

sudo apt install python3-astroquery

sudo apt install python3-scipy

sudo apt install python3-kivy

sudo apt install fim

sudo apt install kivy

sudo apt install libmtdev1

sudo apt autoremove

Notes

Hardware

The Raspberry Pi Zero W is 32-bit and uses ARMv6 instead of the newer ARMv7. The [biggest? only?] difference is in how the processor handles floating point operations.

The Raspberry Pi Zero 2 W is 64-bit.

The Raspberry Pi OS version 11 – the latest version still – is 32-bit. A 64-bit Raspberry Pi OS is in development but not available yet.

To check the version of Raspberry Pi OS installed, cat /etc/os-release.

Python

Python comes already installed with the Raspberry Pi OS. To verify, type python --version. You could install if necessary with sudo apt install python3.8x.

sudo apt update is also a good command to run.

PyCharm on Linux

Pycharm is a the most popular Python editor.

NEVERMIND Develop on Windows, then put the program on the Raspberry Pi after. Or Develop directly on the Pi? Seems like develop on Windows is the best option.

The latest PyCharm is 64-bit and requires a 64-bit OS and 64-bit JDK.

The PyCharm install comes packed as a .tar and compressed as .gz, so .tar.gz. Decompress the file with gzip -d filename.tar.gz, then unpack it with tar -xvf filename.tar. This will create a directory of the same name as the .tar file.

Linux comes with both gzip and tar installed so the commands work right away.

Once unpacked, you can run PyCharm by navigating to the bin folder, in my case /etc/pycharm-community-2018.3/bin and type ./pycharm.sh. You need Java to run it, so …

Ubuntu on a Chromebox

https://mrchromebox.tech/#home

https://cloudbytes.dev/snippets/upgrade-python-to-latest-version-on-ubuntu-linux

https://www.x.org/wiki/

On Ubuntu, to get latest python, sudo add-apt-repository ppa:deadsnakes/ppa, then sudo apt update && sudo apt upgrade -y. To see if a version is available, apt list | grep python3.10

2021 Dec – Astropy and Astroplan Notes

Root a Smartphone – Option for an appropriate processor?

Navigate to About Phone -> Build Number. Tap Build Number 7x for Developer Mode.

Under settings, there will be a new option called Developer Options. Within Developer Options, enable OEM unlocking.

Some useful apps for rooting and installing Linux are

  • Linux Deploy
  • Busybox
  • VNC Viewer

Python

https://www.python.org/downloads/

Raspberry Pi OS and Python versions support and description here.

The command pip3 is made for Python 3, so use it, not just pip.

  • Python 3.9.2 comes installed on the Raspberry Pi OS. Python 3.9.2 was released in Feb 2021.
  • Miniconda 3.5.5 installs Python 2.7.7. Python 2.7.7 was released in Jun 2014 (same month as Miniconda 3.5.5)
  • The Miniconda installation instructions specifically say you can leave Python installed do not remove it (see link below under Miniconda).
  • Astroplan uses the Python package Numpy. Use either the Linux command pip3 list, or python -c "import numpy; print(numpy.__version__)" to find the Numpy version installed.
    • I have Numpy 1.19.5. Is that because the legacy Miniconda installed it or because of the Python 3.9.2 installed on the Raspberry Pi OS? I think it’s the Python 3.9.2 from the OS.
    • Numpy downloads for Raspberry Pi here.
    • On my first test with Astroplan (and Astropy) I had a Numpy error that sent me to this link. The correction was sudo apt-get install libatlas-base-dev. I also updated Numpy with pip3 install numpy --upgrade and it upgraded to Numpy 1.21.5

Miniconda (a Python Distribution)

Astroplan highly recommends to be installed using Conda rather than by manually installing Python and required packages.

Both Anaconda and Miniconda are Conda and Conda is a Python distro. Miniconda is Python plus data science tools. Anaconda is Minconda plus a GUI and more tools.

Do you have to remove existing Python to install Conda? No, you can leave Python installed. But for a legacy Miniconda install with the latest Python? May be an issue?

https://conda.io/projects/conda/en/latest/user-guide/install/linux.html

Legacy Miniconda downloads here. For the Raspberry Pi Zero W (1st gen, which is an ARMv6 processor), I found just one ARMv6 version from the long list of legacy Miniconda installs: Miniconda-3.5.5-Linux-armv6l.sh.

Miniconda 3.5.5 was released in Jun 2014.

For the conda command to work, an appropriate line has to be added to the .bashrc and .bash_profile files. The install does it automatically, BUT: I installed Miniconda into /etc/miniconda and in order to do this, I installed it as root user and because of that, the conda command only worked if I opened the terminal as the root. Of note, once I switched to root and back to pi in the terminal, the conda command still worked as pi. /home/username/.bashrc is for “non-login” shells. /home/username/.bash_profile is for “login” shells

Astropy

Installation instructions: https://docs.astropy.org/en/stable/install.html

Astropy required Python packages.

Astropy installation files archive with various ISA support. Download the appropriate wheel file, then install with the command pip3 install /home/pi/file_name.whl.

Astropy comes with the full Anaconda install. With Miniconda, the recommended way to install Astropy is using the command conda install astropy.

Astropy Version History

Astropy 0.3.0 is what Miniconda 3.5.5 installs. This is a much earlier version than I would have expected. Astropy 0.3 was released in Nov 2013.

Astropy 0.4 was released in Jul 2014. Therefore Astropy 0.3 was the latest version when Miniconda 3.5.5 was released and is probably why Miniconda 3.5.5 installs with Astropy 0.3.

Astropy v1.2 requires Python v2.7 or later and Numpy 1.7.0 or later.

Astropy v1.3: “vectors and coordinates can be reshaped like arrays.”

Astropy v2.0.0 started to implement Python 3 but specifically says does not change functionality with Python 2. However, from 2.0.0 to 2.0.18, Python 2 was gradually phased out.

Astropy v3.0 is the first version that supports only Python 3.

I think I want Astropy v1.3 – unless it won’t run for some reason. Why does Miniconda 3.5.5 install Astropy 0.3.0? Was it the current Astropy at the release time? Answer: yes, it was. Do the newer Astropy versions require newer ISA? At some point, I got a “need ARMv7” error so probably.

However, also unexpectedly, it updates Python from 2.7.7 to 2.7.8. Python 2.7.8 was released in Jul 2014.

Astroplan

2021 Jun – Set up Linux, Apache, MySQL, PHP Server, LAMP Stack

A Server is a Physical Computer

There are various types of servers, but they all consist of a physical computer somewhere. This tutorial shows how to set up a server first with the simplest of physical devices you can have in your home for less than $20 and side-by-side with how to do it in its more abstract – and more common – form, a VPS (virtual private server) you can rent from a hosting service.

The two procedures are very analogous. Seeing them side-by-side helps make concrete what you are actually doing even though sometimes you can’t physically see it.

Server 1. Raspberry Pi Zero W Running Raspberry Pi OS (Debian, a flavor of Linux)

Can be purchased many places, such as Microcenter or Amazon.

Server 2. VPS (Virtual Private Server) Running Ubuntu 20.04 (a flavor of Linux)

I purchased a VPS from Hostwinds. There are various operating systems available. I used Ubuntu 20.04.

Connect to Your Server over a Network (or the Internet)

Connect Via Secure Shell (SSH)

I SSH login using the MobaXterm SSH Client. The server is usually a remote computer to which you do not have physical access, so instead of plugging in a keyboard, mouse and screen, you establish a connection that gives you access to the server’s command prompt. SSH stands for secure shell, meaning the data you transfer between your computer and the server are encrypted. SSH is enabled by default in Ubuntu, but not all Linux flavors.

Useful Linux Commands: https://vitux.com/40-most-used-ubuntu-commands/

1. Raspberry Pi Zero W

Connect the Raspberry Pi Zero to your LAN. There is a way to do this with command line but the Raspberry Pi OS connects to WiFi on the initial startup, so just do it on initialization. If you want, to view the saved password with the command line to know generally where WiFi passwords are stored, use

sudo grep psk= /etc/wpa_supplicant/*

which searches the appropriate directory for “psk=” and you see the stored WiFi keys.

Enable SSH. SSH is not enabled by default with Raspberry Pi Zero. Many tutorials tell you to add a blank file to the /boot folder called SSH (no extension at all). Use the command touch ssh, then reboot. If you do this, notice once SSH is enabled then the file gets deleted so you will not see any change other than the SSH login should work.

Or enable SSH by: in the raspberry pi terminal window, enter sudo raspi-config, select Interfacing Options, SSH, enable it.

2. Ubuntu

Must install openssh-server. Use sudo apt install openssh-server. Check status after install with sudo systemctl status ssh.

Find the Raspberry Pi’s own IP address in the command line with ip add or ip addr or ifconfig. The IP will show after wlan0: inet __.__.__.__ Within a LAN, it is often something like 192.168.1.* Alternatively, you can type your router’s IP into your browser and view a list of connected devices. Or, use nmap, sudo apt install nmap and the command sudo nmap -sn 192.168.1.0/24 (without sudo you won’t see all the MAC addresses)

2. VPS

On a VPS, SSH is (should be) enabled by your host to allow the purchaser to access it. You will get a default username and password from the hosting service who established the VPS with its default settings.

In MobaXterm, “Remote host” is where you specify the IP address of your server, available in your Hostwinds account.

The username is “root”

The password is whatever you set in Hostwinds

Useful Linux Commands

At this point, you are using Linux. Either Raspberry Pi OS or Ubuntu are “flavors” of Linux. Having a list of basic commands is helpful:

https://vitux.com/40-most-used-ubuntu-commands/

Create Non-Root Super-User

This step appears complex and does not appear necessary especially this early in the process. Strictly speaking, it is indeed not necessary. You could skip this step and do everything as the root or default user that already exists. However, it is best to do this now because:

  • to do things in the right order
  • to highlight an important aspect of the Linux OS: that Linux is very user-specific and permissions-based. This makes Linux less intuitive at first but makes it secure enough to be accessed by many different anonymous people as a server without allowing hackers to access sensitive parts of the server.
  • to avoid inevitable frustration later. Using Linux you will see “permission denied” errors periodically throughout your experience and you are better off expecting and troubleshooting them than believing that Linux is just annoying. Permissions are built-in to Linux from the ground up and it’s best to work with it rather than try to ignore it.
  • Logging in as a non-root user is safer. For example, some installations of Ubuntu default to external root login disabled, which means for a remote server you would be locked out if this were set and you don’t have another user to login as.

sudo adduser new_username

usermod -a -G sudo new_username

Change the password for the current user as desired with:

passwd

Grant all privileges to the user with the command sudo visudo and add a line in the /etc/sudoers file below the root user line: new_username ALL=(ALL:ALL)ALL

This only allows the user to give itself privileges. The user does not have all read/write privileges like the root itself. Log in as the new user through SSH.

Optional: Update Operating System

1. Raspberry Pi OS

sudo apt update is the Debian update command (Raspberry Pi OS is based on Debian).

2. VPS

Update Ubuntu (only required if there is a new version of Ubuntu).*

*First, be sure you can login as the non-root super-user before updating Ubuntu as the new install will default to not allow root login. This means if you were planning to just use the existing root user with infinite powers you are now infinitely locked out of your own VPS and have to have your host re-initialize it. Your VPS host changed this setting when it set up your VPS so you can login but when you update the Ubuntu OS, the OS returns to the OS default which is to not allow SSH root login! This is a GREAT example of why to do the user basics as the very first step.

sudo do-release-upgrade

Update the advanced package tool:

sudo apt-get update (without the -get is newer, so I use it)

sudo apt update

Install the “L-A-M-P” Programs

L: Linux, already installed. I used 20.04.

A: Apache. The Apache2 default site appears immediately by typing server IP address in browser.

sudo apt install apache2

P: php

sudo apt install php php-mysql

sudo reboot

php -v

You can test php functionality by making index.php file in the /html/ directory and visiting the file in a browser:

<?phpphpinfo();

M: MySQL. Mariadb seems to be the most widely-used version of MySQL, so I installed mariadb instead of the standard MySQL. The XAMPP controller that establishes localhost for developing uses mariadb. Mariadb is a version of MySQL.

sudo apt install mariadb-server

(I don’t think this was necessary) Enable mysqli in /etc/php/7.2/apache2/php.ini by removing comment ‘;’

extension=mysqli ; nate enabled this

also:

sudo phpenmod mysql

To login to MySQL from the Linux command prompt:

sudo mysql -u root or mysql -u username -p

From the MySQL command prompt, which is “MariaDB” – a version of MySQL, same thing, various self-explanatory commands:

MariaDB [(none)]> CREATE user 'new_username'@'localhost';

SELECT user, host, authentication_string FROM mysql.user;

DROP user 'new_username'@'localhost'

CREATE USER 'new_username'@'localhost' IDENTIFIED BY 'yourpassword';

CREATE database yourdatabasename;

GRANT SELECT, INSERT, UPDATE ON yourdatabasename.* TO 'new_username'@'localhost'; or GRANT ALL ...

ALTER USER 'new_username'@'localhost' IDENTIFIED BY 'yournewpassword';

SHOW DATABASES;

USE yourdatabasename;

CREATE table

Non-Root Super-User Gives Itself Read/Write Privileges

This sounds convoluted and it is when you are accustomed to dealing with desktop computers designed for convenience. Linux is designed for security.

Make a new group, sudo addgroup servermanager, and add the new user to the group, sudo adduser new_username servermanager, groups new_username

make the new group the owner of the required directories:

sudo chown -v -R :servermanager /var/www/

sudo chown -v -R :servermanager /etc/apache2/sites-available/

sudo chown -v -R :servermanager /etc/apache2/sites-enabled

then modify the directory permission to be written by the owner group:

sudo chmod -v -R g+w /var/www/

sudo chmod -v -R g+w /etc/apache2/sites-available

sudo chmod -v -R g+w /etc/apache2/sites-enabled

(Useful Users and Permissions Commands)

Linux has a group and user structure to manage permissions and it is very useful to be able to view the current state:

List all users in the system:

cat /etc/passwd

List all groups on the system:

cat etc/group or less etc/group

or

getent group

for all members of a single group:

getent group group_name

check ownership of a directory, for example:

ls -ld /var/www/

check ownership of a file:

ls -l /var/www/

Find all the files owned by a particular user (may take some time):

sudo find / -user username

Change the active group for the session, possibly not:

newgrp servermanager

delete a group:

sudo groupdel group_name

delete a user (-r removes the user’s directory and mail spool):

sudo userdel -r username

search “linux octal permissions” to understand the numbering system.

Show all currently logged in users on a system:

w

Upload and Enable a Site

With the commands above, you gave the non-root super-user sufficient permission to set up sites.

Upload any site directory to /var/www/html/your_site/

Go to /etc/apache2/sites-available/ and copy the default .conf file:

cp 000-default.conf your_site.conf

and modify with the following information:

ServerName your_site.com

ServerAlias www.your_site.com

ServerAdmin you@email.com

DocumentRoot /var/www/html/your_site

Use the following command to enable the site. What it actually does is copy the .conf file from /sites-available/ to /sites-enabled/:

sudo a2ensite your_site opposite is sudo a2dissite your_site

sudo systemctl reload apache2

to show some server information:

ps aux | grep apache2 | less

#q

to get out of this command.

Make Website Available Outside Your LAN

1. Raspberry Pi Zero W

Once the Pi server is serving a site on its IP within the LAN, making the site available outside the LAN (on the internet) is as simple as directing site requests that arrive to your internet IP to the Pi server. Sounds complicated, but when a browser looks for a website on the internet, it looks on port 80. Most routers have an option to direct all traffic arriving on a specific port to a specific IP within the LAN. Connect to your network’s router to configure it, usually by entering its IP (often 192.168.1.1) into a browser and logging in with a password you set. You should see an option like this under the advanced settings.

To Do: Establish an SSH Connection with SSH Keys for the Non-Root User

Normally, you generate a public and private key on your local computer then copy the public key to the server along with some settings. Hostwinds has an option in server management to generate the key, download the private key, and install the public key on the server. Reboot required.

WordPress from Scratch

On a fresh Debian VPN. Per WordPress.org’s own list:

sudo apt install apache2

sudo apt install php

sudo apt install php-curl

sudo apt install php-[the rest of the recommended extensions]

php -m to see a list of the php extensions installed.

sudo apt install mariadb-server

sudo systemctl start apache2

sudo systemctl start mariadb

sudo mysql_secure_installation

mysql -u root -p


sudo apt install httpd mariadb mariadb-server php php-common php-mysql php-gd php-xml php-mbstring php-mcrypt php-xmlrpc unzip wget -y

Backup the Server

To make a backup file, sudo su root then navigate to root directory, and:

tar cvpzf backup.tgz --exclude=/proc --exclude=/lost+found --exclude=/backup.tgz --exclude=/mnt --exclude=/sys /

Download the resulting file.

To restore:

tar -xvpfz backup.tgz -C /

then, mkdir /proc, mkdir /lost+found, mkdir /mnt, mkdir /sys

reboot

Computer Architecture, Terminology, Classification

Computer Architecture = Instruction Set Architecture (ISA) = Processor Architecture

At its lowest level, software must execute code properly on the processor chip itself. Processor architecture is standardized to allow for code to be written and compiled that works across many individual models of chips. Some common architectures with examples are:

IA-32

IA-32 is the 32-bit version of Intel’s x86 architecture.*

*Notice x86** does not by itself specify an architecture, it is a family of Intel architecture that includes everything from 16-bit released in 1978 to modern 64-bit.

**Note, the x86 Wikipedia article has a good explanation of which chips generally use which ISA.

  • The Intel 80386 microprocessor released in 1985 was the first commercial 32-bit processor.
X86-64 = X64 = X86_64 = AMD64 = INTEL 64

Released by Intel in 2003, 64-bit began to replace 32-bit.

  • Intel Pentium 4 F series.
ARMV8-A

ARMv8-A is the first 64-bit version of the ARM architecture. ARMv8-A is AArch64, which is the same as ARM64.

ARM is a double-acronym. RISC stands for Reduced Instruction Set Computing. All together, ARM stands for “Advanced Reduced Instruction Set Computing Machine.” The ARM architecture in general is maintained by ARM Ltd. in Cambridge, UK.

  • The ARM Cortex-A53 in the Raspberry Pi Zero 2 W uses ARMv8-A and is considered 64-bit.

Operating Systems Classified by ISA

Raspberry Pi OS

Currently, Raspberry Pi does not offer a 64-bit OS, but a beta 64-bit OS is in work and already available for download from the official library.

In a Linux command terminal, you can see processor information including architecture with the command:

lscpu

From Windows PowerShell, you can see processor information including architecture with the command:

systeminfo

Get-WmiObject Win32_Processor

Other Remarkable Clocks

The Antikythera Mechanism

an Astronomical clock from ~100 – 200 BC found in a shipwreck near the island of Antikythera.

On Wikipedia

On YouTube

Optical Lattice Atomic Clocks

Proposed in 2001 by University of Tokyo Professor Hidetoshi Katori, these are very much more accurate than standard atomic clocks. They are accurate enough to measure relativity and geologic density. Experimentally demonstrated in 2005.

Jun Ye, Boulder Colorado Strontium Optical Lattice Clock

https://spectrum.ieee.org/optical-atomic-clock-advantage-expands-electronics

10,000 Year Clock

http://www.10000yearclock.net/

https://longnow.org/clock/

Astronomical Skeleton Clock

Commissioned by Mark Franks in Chicago. Built by Buchanan in the UK.

Suppliers, Surplus, Related Companies

Used Stuff

https://craigslist.org/

eBay

Auction Ohio

Retail Surplus

https://www.adorama.com/

https://www.newegg.com/

https://www.overstock.com/Electronics/2/store.html

Government Surplus

https://www.govdeals.com/ – Ohio State sells their surplus here.

Watch Parts and Tools

https://www.esslinger.com/ – has lots of tools.

https://www.startimesupply.com/ – good for batteries and miscellaneous watch parts, must be a verified business to order

http://www.julesborel.com/ – see the JBC watch parts database

Cas-Ker Watchmaker and Jeweler Supplies

– based in Cincinnati, tools and parts.

Otto Frei Jewelry Supply and Watch Parts – large selection of watch crystals

Auctions

https://www.bidfta.com/bidderHome

Miscellaneous

Piano Tools

Science Experiment Supply

Mobilinkd, Terminal Node Controllers for Amateur Radio

https://www.beltime.com/

Henning Custom Watch Parts

Hub City Time

McCaw Watch Parts

Crown and Caliber

Lucius Atelier


Watches and Clocks Career

Ohio is home to one of the main professional institutes:

https://www.awci.com/

NAWCC in Pennsylvania

Various schools around the country:

https://www.awci.com/rec-schools-2/

Gem City, Illinois

Paris Junior College, Texas

NAIOSWM WOSTEP program, Dallas

SAWTA Curriculum

Central Ohio

Local Retail Resource

Existing American Companies

Made in USA?

Not made in USA

Other

During the quartz crisis in Switzerland, Swatch bought Eta, who made 90% of the movements at the time. Swatch made movements nearly impossible to obtain for mechanical watches. Tag Haur and Breitling stood up to Swatch and bought movements from a new company, Saleta, who copied the movement from the old Eta.

https://www.watchfix.com/

Audio Terminology

Stereo Versus Mono

Stereo sound means left and right can be a different audio signal. Usually the two signals are nearly identical, but sometimes the difference is very noticeable. A stereo signal is two mono signals. Most people are familiar with this concept.

“Channel”

When buying mixers, pay attention to what “channel” means. Each stereo input is two channels. Therefore a “four-channel” mixer or recorder can often only properly handle two inputs. Indeed each channel is a separate audio signal, but if configured as stereo, there will only be one volume control for two channels together, for example, among other inconveniences. The mixer I bought is 12 channels, 4 microphone (mono by their nature) and 4 stereo inputs for a total of 8 separate volume controls. 8 has been plenty for me and I expect to never exceed it in my whole life.

Balanced Audio Signal Versus Unbalanced Audio Signal

Balanced audio uses two separate conductors carrying the same audio signal with opposite polarity. There is also a third conductor called ground or shield. The advantage is any noise picked up by the cable is picked up equally on each of the two conductors and therefore the noise cancels itself out leaving only the audio signal. The most common example is a microphone connected to an XLR input. See the XLR pin diagram below as the archetypal balanced audio example.

Unbalanced audio uses a single conductor to carry the audio signal, plus a ground. The most common example is headphones. There are three conductors because of stereo sound but each of the signals is a single unbalanced audio signal to the headphone speakers.

Microphones: Dynamic, Condenser, Electret Condenser, MEMS

Dynamic microphones use a magnet and coil to produce the audio signal. Advantages: do not require phantom power as the moving coil produces the electric signal, no self-noise, better at loud sounds, usually rugged and durable. Disadvantages: not as good at capturing detail. The most common example is the Shure SM58 performance mic.

Condenser microphones are delicate studio microphones that require phantom power to charge a “backplate.” While they produce some self-noise, they are better than dynamic mics at capturing sound detail, especially with with quality phantom power and using balanced audio signal. The most common examples are studio music recording mics and tech nerd podcasts. There are large diaphragm and small diaphragm condenser mics but if you care about that you are reading beyond this post.

Electret condenser microphones cheap and small. They don’t match professional mics in quality but they are very good and make up for the quality with small size and price. They are condenser microphones because they use a capacitor (charged plate) to produce the signal, but they do not require phantom power because the “backplate” is chemically charged in a way that does not decay for hundreds of years – pretty much permanent charge, like a permanent magnet. Note: I have had little success connecting these microphones to an audio mixer. While the description says they do not require power, I have also heard that they require 5V or 12V or 3-12V that is provided automatically by the computer or phone they are connected to. … ?

Cell phones use MEMS microphones (MEMS = microelectro-mechanical systems) because MEMS microphones are etched directly onto a silicon chip, often together with required circuitry, and they require very little power.

Phantom Power

Condenser microphones require phantom power to charge a backplate.

  • Music mixers provide phantom power on their XLR inputs.
  • Phantom power is almost always de-selectable with a switch on the mixer.
  • Although dynamic mics do not require phantom power, most will not be damaged by it. Many musicians use phantom power with dynamic mics all the time without knowing what it is and the only result is a barely-audible hum.
XLR Input and Pin Diagram

An XLR input is a dedicated balanced input typically designed for microphones.

Male Versus Female

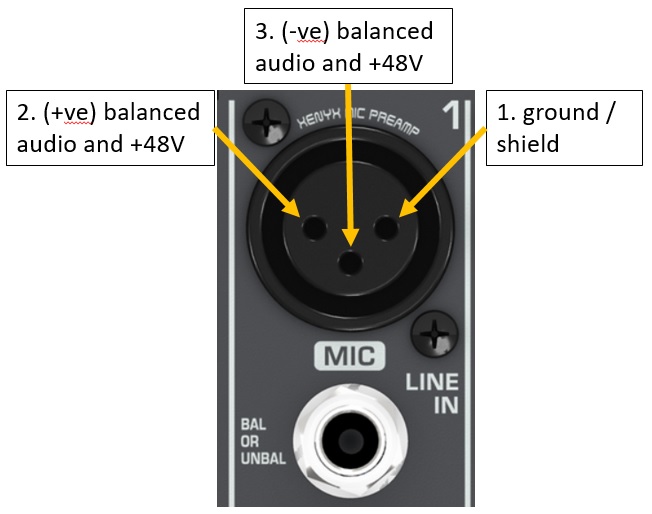
I don’t need to explain “the birds and the bees” here, but pay attention with XLR because it’s not immediately obvious especially when buying cables. Pictured above is female XLR that would require a male cable to connect.

TRRS Diagram

TRRS stands for “tip ring ring sleeve.” The only use I know for TRRS is stereo sound plus microphone:

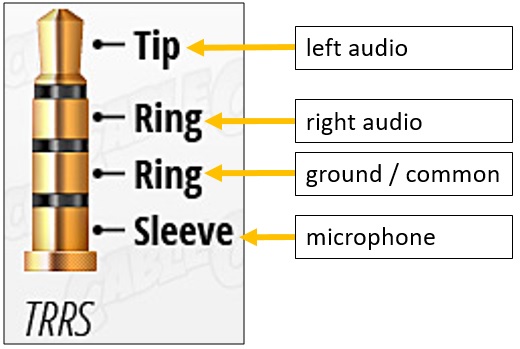
*Note: some TRRS diagrams show the microphone as a ring and the sleeve as ground, but I believe this was probably an old standard now obsolete that was abandoned because the audio signal could interfere with the weak microphone signal.

TRS and TS

TRS is “tip ring sleeve.” The standard example is stereo headphones:

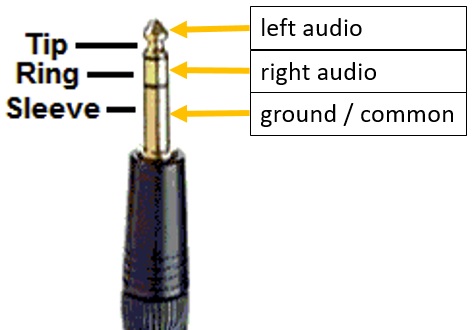
Notice the two signals on standard TRS headphones are unbalanced, therefore unbalanced stereo. Unbalanced sounds “bad” but it is just slightly more susceptible to noise than balanced audio, an effect less important than many other factors in most cases.

TS is, you guessed it, “tip sleeve.” The most common TS example is a mono audio signal. The tip is the audio signal and the sleeve is ground.

“Phone Plug” Sizes (“Phone Plug” = TRRS, TRS, & TS)

I quote “phone plugs” because although it may be the official term, you will have better luck searching TRRS / TRS / TS. “Phone plugs” come in the following sizes:

  • 1/4″ = 6.3mm = “phone plug” = “the big ones”
  • 1/8″ = 3.5mm = “mini-phone” = “normal headphone”
  • 2.5mm = “sub-mini phone plug” = “the tiny little ones”
Balanced Audio on TRS

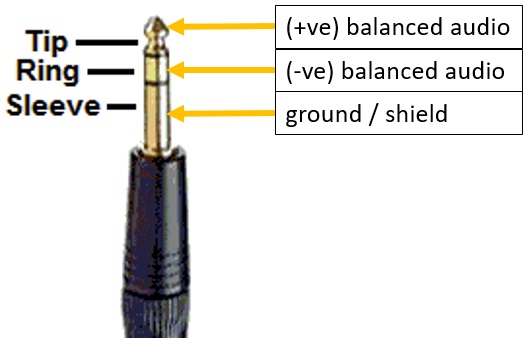
TRS can be used to carry a (mono) balanced signal (not common). For example, see the female 6.3mm TRS input on the XLR diagram above. The TRS input says “BAL OR UNBAL” beside it. A TRS balanced signal looks like this:

Signal Levels: Passive, Powered, Amplified

These are not “official terms,” but I would say there are three “signal levels.”

A passive signal is the signal a microphone produces for example. The signal is generated by the physical movement of the internal parts of a microphone. These signals must be amplified and are therefore sensitive to noise because any noise picked up will be amplified along with the audio signal. For this reason, passive signals often use balanced audio. Passive signals cannot even drive headphones.

A powered signal is the most common type. Once any electronics are involved, there are small amplifiers to drive the signal. Any powered signal can drive headphones, but usually not a speaker without external power.

An amplified signal can by itself drive a large speaker that does not have external power. Notice, with mono audio, some amplifiers will output an amplified signal via TS capable of driving a large speaker. You must use a robust TS mono cable to carry this signal to drive the speaker and not all TS mono cables are capable of this.

RCA Connectors

RCA connectors are common enough to warrant their own heading. They usually carry unbalanced mono signals and come in color-coded pairs for stereo.

Analog Versus Digital

All signals I refer to here are analog. USB is a good example of digital. Digital signals can be manipulated by software and digital can travel lossless over long distances. Digital has its advantages, but the conversion to digital and back to analog means delay even locally so once you are dealing with digital signals, you cannot listen to locally-produced sounds in real-time because you can perceive the small delay.

Bluetooth Transmitter

Once you have an audio signal on a standard headphone TRS, notice how versatile a Bluetooth transmitter can be with battery-powered Bluetooth speakers. Search for a Bluetooth transmitter and find many options, very affordable.

Bluetooth Receiver

If you want to mix in a pre-recorded track, a Bluetooth receiver is a great option to connect a music-playing smartphone or other digital device to your mixer. Many options, very affordable.

Surround Sound

I don’t know! I’m sure a home theater system salesman can talk for hours about it for free though!